
Flooring
Professional Timber Floor Sanding Installation: Reviving the Elegance of Your Spaces
Introduction
Timber floors are not only timeless and beautiful but also durable and long-lasting. However, with regular wear and tear, they can start to lose their luster and appeal. This is where professional timber floor sanding installation comes into the picture. With the right techniques and expertise, you can restore the elegance of your timber floors and breathe new life into your spaces. In this blog post, we will delve into the steps involved in professional timber floor sanding Melbourne , highlighting the importance of each stage and providing tips for a successful project. So, let’s get started!
- Assessing the Condition of the Timber Floor
To begin the timber floor sanding installation process, the first step is to assess the condition of the floor. A professional timber floor specialist will thoroughly examine the timber floor to identify any issues such as uneven surfaces, gaps, or structural damage. This assessment is crucial as it helps determine the level of sanding required and enables the specialist to provide an accurate estimation of the project timeline and cost.
Once the assessment is complete, the timber floor specialist will discuss the findings with the homeowner and provide recommendations for the best course of action. This transparent communication sets the stage for a collaborative and successful timber floor sanding installation project.
- Preparing the Area
After assessing the condition of the timber floor, the next step is preparing the area for sanding. This involves removing all furniture, rugs, and any other items from the space. It is essential to have a clear and unobstructed workspace to ensure efficient sanding and prevent any damage to the belongings.
In addition to clearing the area, it is vital to cover any surfaces, vents, or fixtures that may be vulnerable to dust and debris during the sanding process. Professional timber floor sanding specialists use protective sheets and tapes to seal off doorways and cover any exposed surfaces, ensuring that the sanding process remains contained and results in minimal disruption to the surrounding spaces.
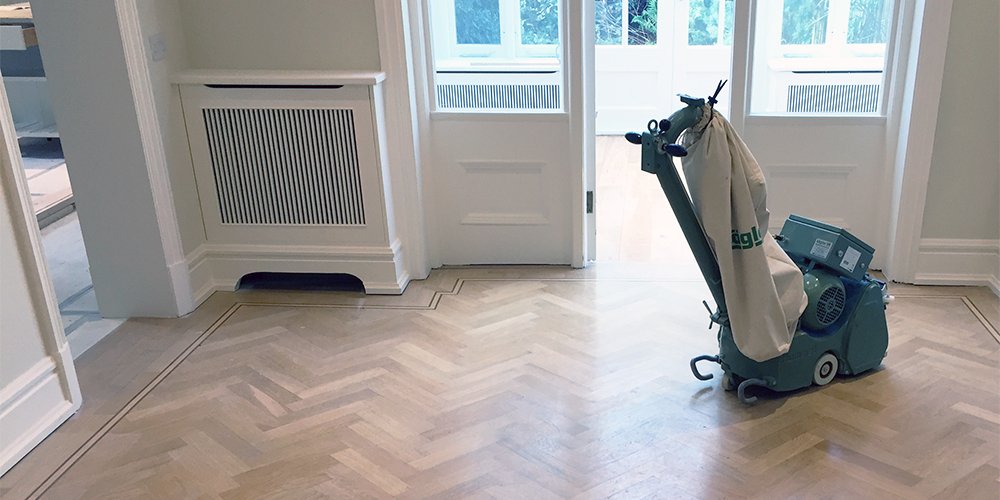
- Sanding the Timber Floor
Once the area is prepared, the timber floor sanding process can commence. Using specialized sanding machines, the floor is carefully sanded to remove the existing finish and expose the bare timber underneath. This stage requires expertise to achieve a smooth and consistent sanding result.
The sanding machines used by professional timber floor specialists are designed to remove multiple layers of finish efficiently and evenly. The sanding process typically involves using different grits of sandpaper to progressively refine the floor’s surface. The initial coarser grits remove the initial layers of finish, while the finer grits create a smooth and uniform surface.
Timber floor sanding specialists pay close attention to detail during this stage, ensuring that all areas of the floor are sanded evenly and any imperfections, such as scratches or stains, are addressed.
- Filling the Gaps and Cracks
In some cases, timber floors may develop gaps or cracks over time due to changes in temperature or humidity. To achieve a flawless final result, these gaps and cracks need to be filled before proceeding with the timber floor sanding installation.
A professional timber floor specialist will use an appropriate filler material that matches the color of the timber floor. The filler is carefully applied to the gaps and cracks, ensuring that it seamlessly blends with the surrounding wood once dried. This step is crucial in ensuring the visual appeal and structural integrity of the timber floor after the sanding process is complete.
- Fine Sanding and Smoothing
After the gaps and cracks are filled, the timber floor specialist proceeds with fine sanding and smoothing of the surface. This stage involves using finer grit sandpaper to achieve a smooth and uniform finish. The goal is to remove any remaining imperfections, such as slight inconsistencies in the surface or small scratches.
During this stage, the timber floor specialist pays close attention to transitions between different sections of the floor, ensuring a seamless and consistent appearance. The fine sanding process enhances the natural beauty of the timber floor and prepares it for the subsequent steps of the installation process.
- Timber Floor Polishing: Adding a Protective Finish
Once the sanding and smoothing process is complete, it is time to apply the protective finish to the timber floor. Timber floor polishing is an essential step as it not only enhances the appearance of the floor but also provides protection against future wear and tear.
Choosing the right timber floor polishing product is crucial for achieving the desired result. Various options are available, such as water-based, oil-based, or polyurethane-based finishes. A professional timber floor specialist will consider factors such as the type of timber, the desired level of sheen, and the level of foot traffic the floor will experience when selecting the appropriate polish.
The polishing process typically involves applying multiple coats of the chosen polish and allowing sufficient drying time between each coat. This ensures maximum durability and a beautiful, long-lasting finish.
- Sanding Between Coats
To achieve a flawless and smooth finish, sanding between coats of polish is a critical step in the timber floor sanding installation process. Sanding between coats removes any imperfections such as bubbles or dust particles that may have settled on the surface during the polishing process.
Using fine-grit sandpaper, the timber floor specialist gently sands the surface, creating a smooth and even texture. This step is followed by thoroughly cleaning the area and ensuring that there is no residual dust before applying the next coat of polish. The sanding between coats process may be repeated several times, depending on the desired level of perfection and the type of polish used.
- Final Inspection and Touch-ups
Once all the coats of polish are applied and the sanding process is complete, a final inspection is conducted to ensure the quality and perfection of the timber floor. The professional timber floor specialist examines the entire floor, paying attention to details such as color consistency, smoothness, and any remaining imperfections.
During this stage, any necessary touch-ups are made to address any minor issues that may be identified during the inspection. Touching up specific areas ensures that the timber floor sanding installation project leaves no room for dissatisfaction and that the end result is nothing short of immaculate.
- Finishing Touches: The Transformation is Complete
After the thorough inspection and touch-ups, the timber floor sanding installation project is finally complete. The once dull and worn-out timber floor has been transformed into a stunning centerpiece of your space, radiating beauty, elegance, and warmth.
With proper care and maintenance, your newly sanded and polished timber floor will continue to bring joy and sophistication to your home or commercial space for years to come. Regular maintenance practices such as sweeping, vacuuming, and using appropriate cleaning products will help preserve its shine and durability.
Investing in professional timber floor sanding installation not only enhances the aesthetic appeal of your spaces but also adds value to your property. By restoring the natural charm of your timber floor, you can create a welcoming and inviting atmosphere that will leave a lasting impression on everyone who sets foot on it.
Remember, when it comes to timber floor sanding installation, choosing experienced and reputable professionals like Timber Floor Polishing Melbourne ensures exceptional craftsmanship, excellent customer service, and a beautiful final result that exceeds your expectations every time.